If you're looking for our wedding website with all the details, gift registry etc, please go to http://www.phoenixandmoose.com/.
And if you don't want to spoil the surprise of what everything's going to look like on the day, DON'T SCROLL DOWN ANY FURTHER!
Wednesday, June 15, 2011

Tuesday, February 15, 2011
The Groom has Decided!
Finally, a decision on what the boys are to wear on our big day. Still no word on what he himself will be wearing though..
Indigo slim-fit jeans
White-on-white collared shirt; half-sleeve
Silver blazer with sleeves rolled up
Black patent leather brogues
Paisley silk scarf (similar colours to bridesmaids' dresses)
Paisley pocket square (although this may clash with the idea I have for boutonnieres)
Indigo slim-fit jeans
White-on-white collared shirt; half-sleeve
Silver blazer with sleeves rolled up
Black patent leather brogues
Paisley silk scarf (similar colours to bridesmaids' dresses)
Paisley pocket square (although this may clash with the idea I have for boutonnieres)
DIY: Paper Rosettes
In the past few weeks I've been filling my spare time with making a variety of 'hanging things' for the reception. Since it's quite a cavernous space (it used to be a church, so the roof is more than double volume), I felt we needed something to make the space more cosy and intimate.
First was the giant poms, the tutorials of which I've posted before. I've also made doily garlands and started on some paper rosettes today, inspired by Rebecca Thuss:


First was the giant poms, the tutorials of which I've posted before. I've also made doily garlands and started on some paper rosettes today, inspired by Rebecca Thuss:
I followed a little step-by-step by Paper Source. The trick is to use 3 pieces of paper for each rosette, otherwise it can be tricky to close them up at the end. (Apologies for the poor quality photos, I got lazy today and used Photobooth..)
You will need:
- 3 12x12" pieces of scrapbooking paper (I find it makes them a little more robust this way than just using ordinary copy paper)
- double-sided tape
- fishing line, ribbon etc for hanging
Accordion fold each piece of paper (folds about 2cm wide).

Flatten out the sheet and fold in half. Refold the pleats. (This makes the next step a bit easier).

Fold the whole thing in half and join the two ends with double-sided tape.
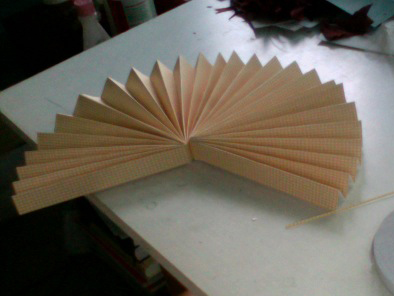
Repeat for the other two pieces and then join them all together! When joining the last two sides, you may want to encase your ribbon between two layers of tape so you don't need to punch a hole later.

The finished rosettes!
Saturday, January 8, 2011
Inspiration Board 2
 |
| Credits: Ruffled, Once Wed, 100 Layer Cake, Love and Splendour, Amy Atlas, Green Wedding Shoes, Snippet & Ink. Dress: Vera Wang. Tent: Villa Kula. Cupcake: Utterly Engaged(?). Veil: Delphine Manivet. Flowers: The Orange Blossom, Amy Osaba, don't remember where the gorgeous one on the right is from! |
2 week holiday = DIYing spree!
Our goal is to create as much as possible ourselves for our wedding. This includes my veil, bridal jacket, boutonnieres for the boys, pomanders for pew decorations, all the reception decor (including a 'dessert tent' inspired by the Indian mandap and a park bench photobooth), stationery suite and desserts!
I've been busy the past 2 weeks of my holiday making a lot of this.

I've finally started painting the hundreds of jars my family's been diligently collecting. I used glass paint from Eckersley's. Originally I was going to paint them all, but decided on leaving the large ones plain and using them as vases, while the small coloured ones will be for battery operated tealight candlessupplied by my lovely aunt :)
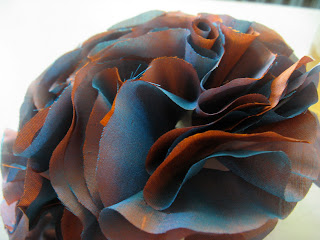 One of the pomanders to go at the end of each pew row. I bought the beautiful two-toned fabric from Fabricana on Etsy.


And last but not least, my wedding jacket! This was one of those weird decisions where I find myself um-ing and ah-ing for months, then suddenly decide to do something and get straight to it. Even the night before making this, I was contemplating a soft cream cardigan to keep me warm. A fur stole or bolero was also an option, but Naman and I aren't too keen on it (even the faux variety) and I don't think it would have fit in as well as a jacket. The funny thing is I'd starting making this before I'd even met him!
It started as a tiny little waistcoat from the Stylish Dress Book 2 with silk ruffles made from leftover fabric from my Year 12 Textiles major work. I added some off-white silk charmeuse and chiffon (offcuts from my wedding dress), old tulle, lace that belonged to my great-grandmother and a few pearl beads. I love that all these bits have a bit of a story attached to them. I simply added sleeves (from another pattern in the same book) and a lining. The back is white silk charmeuse overlayed with lace; the same as we used for the bodice of my dress. I'm thinking of adding some more ruffles all around the edge as well as a bigger ruffle along the bottom as the front is actually quite small. And I still need to hand stitch the lining in place at the armholes :(
Love,
Moose
I've been busy the past 2 weeks of my holiday making a lot of this.
I've finally started painting the hundreds of jars my family's been diligently collecting. I used glass paint from Eckersley's. Originally I was going to paint them all, but decided on leaving the large ones plain and using them as vases, while the small coloured ones will be for battery operated tealight candlessupplied by my lovely aunt :)


Due to budget constraints, there was no way we could afford custom letterpressed stationery, but I still wanted to have some kind of printed design. So I tried out lino printing! The paisley design was pretty tricky to cut out and I'm not sure it works all that well with our thick, textured paper, but we'll see how it goes.


It started as a tiny little waistcoat from the Stylish Dress Book 2 with silk ruffles made from leftover fabric from my Year 12 Textiles major work. I added some off-white silk charmeuse and chiffon (offcuts from my wedding dress), old tulle, lace that belonged to my great-grandmother and a few pearl beads. I love that all these bits have a bit of a story attached to them. I simply added sleeves (from another pattern in the same book) and a lining. The back is white silk charmeuse overlayed with lace; the same as we used for the bodice of my dress. I'm thinking of adding some more ruffles all around the edge as well as a bigger ruffle along the bottom as the front is actually quite small. And I still need to hand stitch the lining in place at the armholes :(
Love,
Moose
Friday, June 25, 2010


Saturday, May 29, 2010

Home dreaming
I just bought the top two prints by Peggy Wolf Design on Etsy, but think the two below would go with them just perfectly. Hopefully we can put them up somewhere in our new place..

Phoenix and I still have different ideas on what our home will be like. He thinks it'll be a proper house with multiple rooms and massive sound system; I think it's more likely to be a smallish one-bedroom apartment or studio.
At the moment I'm trying to figure out what furniture & other homey things we need to get, as well as what I already have that can be used.
Also facing the dilemma of what to do when a yet-to-be-engaged friend has so many similar wedding ideas (that she constantly shares with us). Do I tell her I was thinking of doing the same thing, or just modify my original plans a bit so it doesn't seem like I'm copying her?

Phoenix and I still have different ideas on what our home will be like. He thinks it'll be a proper house with multiple rooms and massive sound system; I think it's more likely to be a smallish one-bedroom apartment or studio.
At the moment I'm trying to figure out what furniture & other homey things we need to get, as well as what I already have that can be used.
Also facing the dilemma of what to do when a yet-to-be-engaged friend has so many similar wedding ideas (that she constantly shares with us). Do I tell her I was thinking of doing the same thing, or just modify my original plans a bit so it doesn't seem like I'm copying her?
Sunday, April 25, 2010
Wedding Inspiration: Irina Graewe
Looking through the archives on EatDrinkChic the other day, I found the wonderful work of Irina Graewe. Many of her interiors images could be used as inspiration for wedding decor.


Paper doily stencils.
Spray down a paper runner as 'coasters' or place settings.

Old willow pattern plates with bright cutlery and stencilled initials for place settings.

Stack of love letters, sheet music of meaningful songs etc on a table with the guestbook.

Brightly patterned umbrellas for bridesmaids to use instead of parasols. Or to shade tables at an outdoor reception.

Mismatched chairs and patchwork table cloth with crystal glassware and lots of fresh flowers for an intimate dinner reception.

More mismatched chairs, and cutout paper garlands.

Delicate vintage china and antique silver spoons for a tea party.

Glass tea and coffee pots, decanters of dessert wines for after-dinner celebrations. This would look gorgeous with masses of candles.

Empty frames on a paper backdrop for guests to write messages in or to display seating plans.
All images by Irina Graewe
Sunday, April 11, 2010
Decorations: Floral
Since marigolds aren't in season for our wedding, we're thinking of stringing garlands of fabric/tissue paper substitutes along the backs of the reception chairs.

via Once Wed
These strings of silk flower petals/cotton bolls would look great over the table to add some height. The best thing is they can be made well in advance like the garlands.

via 100 Layer Cake


via Darling Dexter
Absolutely love the floral 'specimens' by Kristen (The Treasured Petal) and Angel. And who would've thought the 'Milk & Honey' tablescape by Paige and Kelly was inspired by the first time John Lennon and Yoko Ono met? I don't know what those little hanging orbs are called, but I need to get my hands on some :)

via Love & Splendor

via Once Wed

via snippet&ink
Saturday, April 10, 2010
This dress..
..keeps popping up everywhere these days.

It's a Vera Wang, from a few seasons back I think. Would love to incorporate some of that draping into my own dress, but then I'd need to rethink the fitted lace back I've been imagining.
Friday, April 9, 2010
Flowers: Ruby Slipper
I think I've finally found the perfect florist!
Ruby Slipper describes their style as "girly and vintage with a freshly 'hand-picked from the garden' feel". They show just a few bouquets on their site but enough to get a good idea of their style.
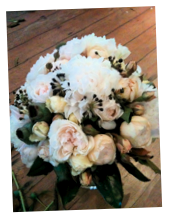


Plus they have a selection of props including vintage teacups! Find them here.
Ruby Slipper describes their style as "girly and vintage with a freshly 'hand-picked from the garden' feel". They show just a few bouquets on their site but enough to get a good idea of their style.


Plus they have a selection of props including vintage teacups! Find them here.
Wednesday, April 7, 2010


Saturday, April 3, 2010


Subscribe to:
Posts (Atom)